
Build Your Template

Your company may have its own document templates for your use. That’s amazing, and you should totally make use of it. But also, you should have some idea on how to set up your own s***. That way you can make modifications, troubleshoot issues, etc. If your company does not have its own template, you’re in luck because you’re about to learn how to make your own.
Styles: Let’s start by talking styles. If you are highlighting your heading text and selecting Calibri, size 18, and bold… I’m here to tell you that you’re doing it wrong. You can set up font styles for all your body text, headings, captions, and more using styles. This will ensure consistency of formatting and it provides easy modification of the font formats throughout your report (similar to styles used in CAD). Just be sure to set up your other fonts to be based on Normal. That way if your project requires you to use Times New Roman, you can easily change all the styles at once - headings, captions, everything! Using styles also allows you to make use of the automatic Table of Contents which will generate with your heading labels.

To edit your styles, you can click the “Home” toolbar from the top > Go to “Styles” > Right click and select “Modify”

Alternatively you can open up the module by clicking the little arrow at the bottom right of “Styles” to modify your styles.
Heading Numbers: Next you’ll want to number your headings. I guess numbering your headings is technically optional. But providing the heading number instantaneously gives the reader an indication of how the subsection fits within the greater section (Section 3.5 Design Life falls under Section 3 Alternative A), so I always like to put heading numbers into my reports. To learn how to do this, check out the picture below. I recommend this way over using the automatic numbering function to get your headings and subheadings to number properly. Note that numbering your headings will also allow you to number your figures with the heading number (like Table 4-2 for the second table in section 4). For more information on that see Captions below.

To add heading numbers, you can click the “Home” toolbar from the top > Click the list icon > Select the option shown above. (You could probably play around with other styles, but in my opinion the one the cursor is point to is the best one.)
Tables of Contents, Figures, and Tables: This should be an easy one that most of us already know. You can set up your table of contents, figures, and tables to generate automatically. Once you’ve written up your report, you just need to update your tables and the items and page numbers will automatically generate in your tables. The tables will also be hyperlinked, allowing a reader to easily click to a section from the Tables.
To add a Table of Contents, you can click the “References” toolbar from the top and click the icon shown with cursor labeled “A.” To add a Table of Figures or Tables, you can click the icon shown with the cursor labeled “B.”
Content: If you are creating reports with very similar formats, you might as well set up your basic outline now. Set up your cover page, executive summary, table of contents, table of figures, table of tables, list of appendices, and put in headings for your introduction, body, and conclusion. You can standard text or tables that you frequently use in your reports. Anything that you think will give you a nice head start every time you start a new report.
Headers and Footers: Setting up your headers and footers should be a no-brainer, so I’m not going into the basics. What I do want to talk about is how to set up different headers and footers for different sections of the report. Let’s say I want the cover page to have no header or footer, the executive summary and table of contents to use lowercase roman numerals, and the rest of the report to use numbers. (Initiate Kelly Kapur impression) Oh no, what do I do? What I do is this. I go on Word, I go click click and I follow the instructions below.

To be able to modify your headers and footers from one page to the next, you first need to add a section break (a CTRL+Enter section break isn’t enough). To do this, you can click the “Layout” toolbar from the top > Click on “Breaks” > Select “Next Page” under “Section Breaks.”

Once you’ve added the proper section break, you can double click within the Footer to open the Header and Footer toolbar at the top. Then you can click the “Link to Previous“ button shown with the cursor above. This will break the link and allow you to modify the Footer as you see fit without affecting the previous Footer.
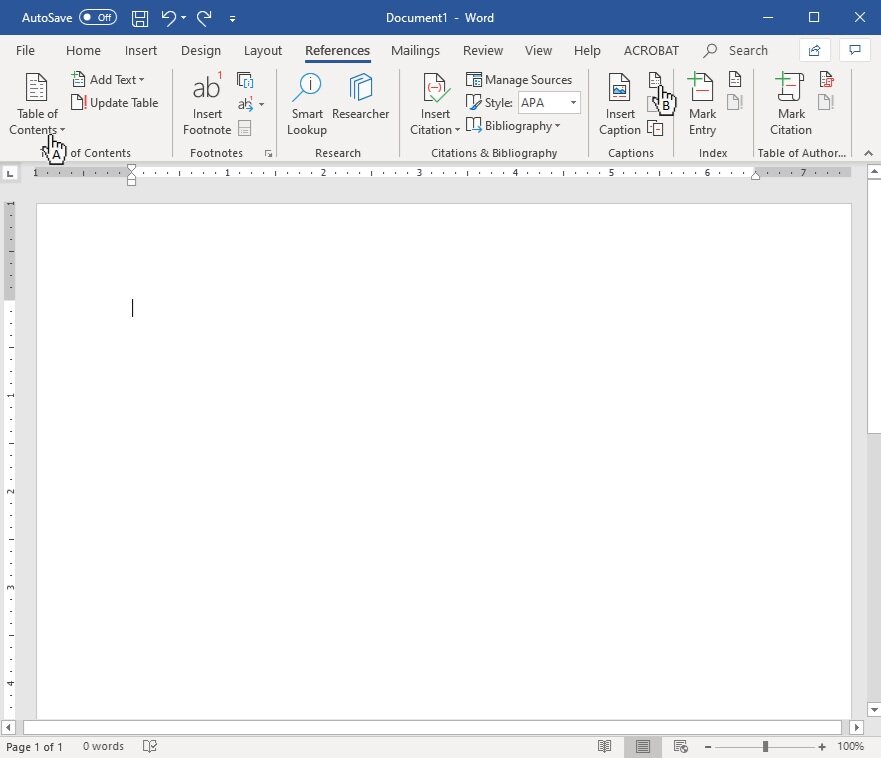
References: Word also has functions to easily create citations and bibliography. You can even choose the style APA, Chicago, or other. I don’t use this function often, so I don’t have a bunch of stuff to say about it. But check out the screenshots below on how to get to the function.

You can find the Citations & Bibliography section under the “References” toolbar as shown with the cursor above.
Captions: First of all, let me start by saying table captions always belong above the table. Don’t be putting your table captions below the table. Second of all, keep your captions concise. There’s no reason your caption should run on two lines in your table of figures. All of those words don’t need to be there, you’ve got to f***ing edit people. If you want your captions to number with the heading number, dash, then the consecutive numbering, just follow the images below.

To get your Captions to number with the heading number, you can click the “References” toolbar from the top > Click on the “Insert Caption” icon indicated with the cursor labeled “A” > You can select the “Numbering…” button in the Caption dialogue box indicated with the cursor labeled “B” > Then under the Caption Numbering dialogue box select “Include chapter number” indicated with the cursor labeled “C.”
Cross-References: If you want to reference a section of the report, table, figure, page number, please do NOT just type it in. Use the cross-reference function to make sure that any changes that are made are captured automatically. You can also use the cross-reference function to say above or below (ex. See Table 6-1 below) so that if you move the reference item to a different location, the text will change automatically when you update fields. When you’re done writing your report, you can CTRL+a to select all, right click, and select update field. Then when Word asks you if you want to update page numbers only or update the entire table, choose to update the entire table.

To add a cross reference, you can click the “Reference” toolbar from the top > Click on the “Cross Reference” button indicated with the cursor labeled “A” > Select the reference type (Table, Figure, Heading, etc.) by clicking the drop down menu indicated with the cursor labeled “B” > Select what type of reference by clicking the drop down menu indicated with the cursor labeled “C”
Final Check: As a finishing touch, I like to put a little reminder comment at the top of my template with a checklist. It can remind me to spell check, update fields, update a revision block, save a version copy in an archive folder, and whatever else I feel like reminding myself.
You might have more questions on how to use some of the functions I described above. But the great thing is that now that you have an idea of the possibilities and the keywords, you should be able to google the answers. There are lots of people online that are better at Word than I am who can assist you in your endeavors. But if you have any questions or if you have any hot tips on how you like to set up your documents, you can comment below.